
Backstory: Transforming a Childhood room into an adult’s sanctuary
Links marked with * are affiliate links. As an Amazon Associate I earn money from qualifying purchases at no cost to you. I am not sponsored ahead of time to use these products. They are the ones I choose to use, but if you buy anything through my links I get a small commission that helps me create more content.
Once upon a time I was a 10 year old that thought a pink and purple room would be the best thing ever. It lasted about 4 years before the pink became bright green, but the green and purple lasted another 12 years. A lot people move out around 18, so the room you pick as a kid isn’t something you have to worry about as an adult or your parents never let you paint bright and crazy colors in the first place, so it translates into adulthood better. I love my parents for letting me be an expressive child and I did move out for small chunks of time when I did my undergrad and when I was in Peace Corps, but those were temporary and I always came back to my old room. With the cost of renting, let alone buying, way to high and with me still being in school it wasn’t the smart choice to move out, so I was back in the room that I designed when I was 10 years old with a its bright walls, twin bed, and 16 years of accumulation. I needed a change….
Welcome to my quest to change up my bedroom. Check out my video and/or scroll down for the written version.

The old room in its natural messy state….
I really did try, but with as much stuff as I had there just wasn’t enough room for it all, so things literally piled up. I knew where it all was, but it didn’t look pretty.
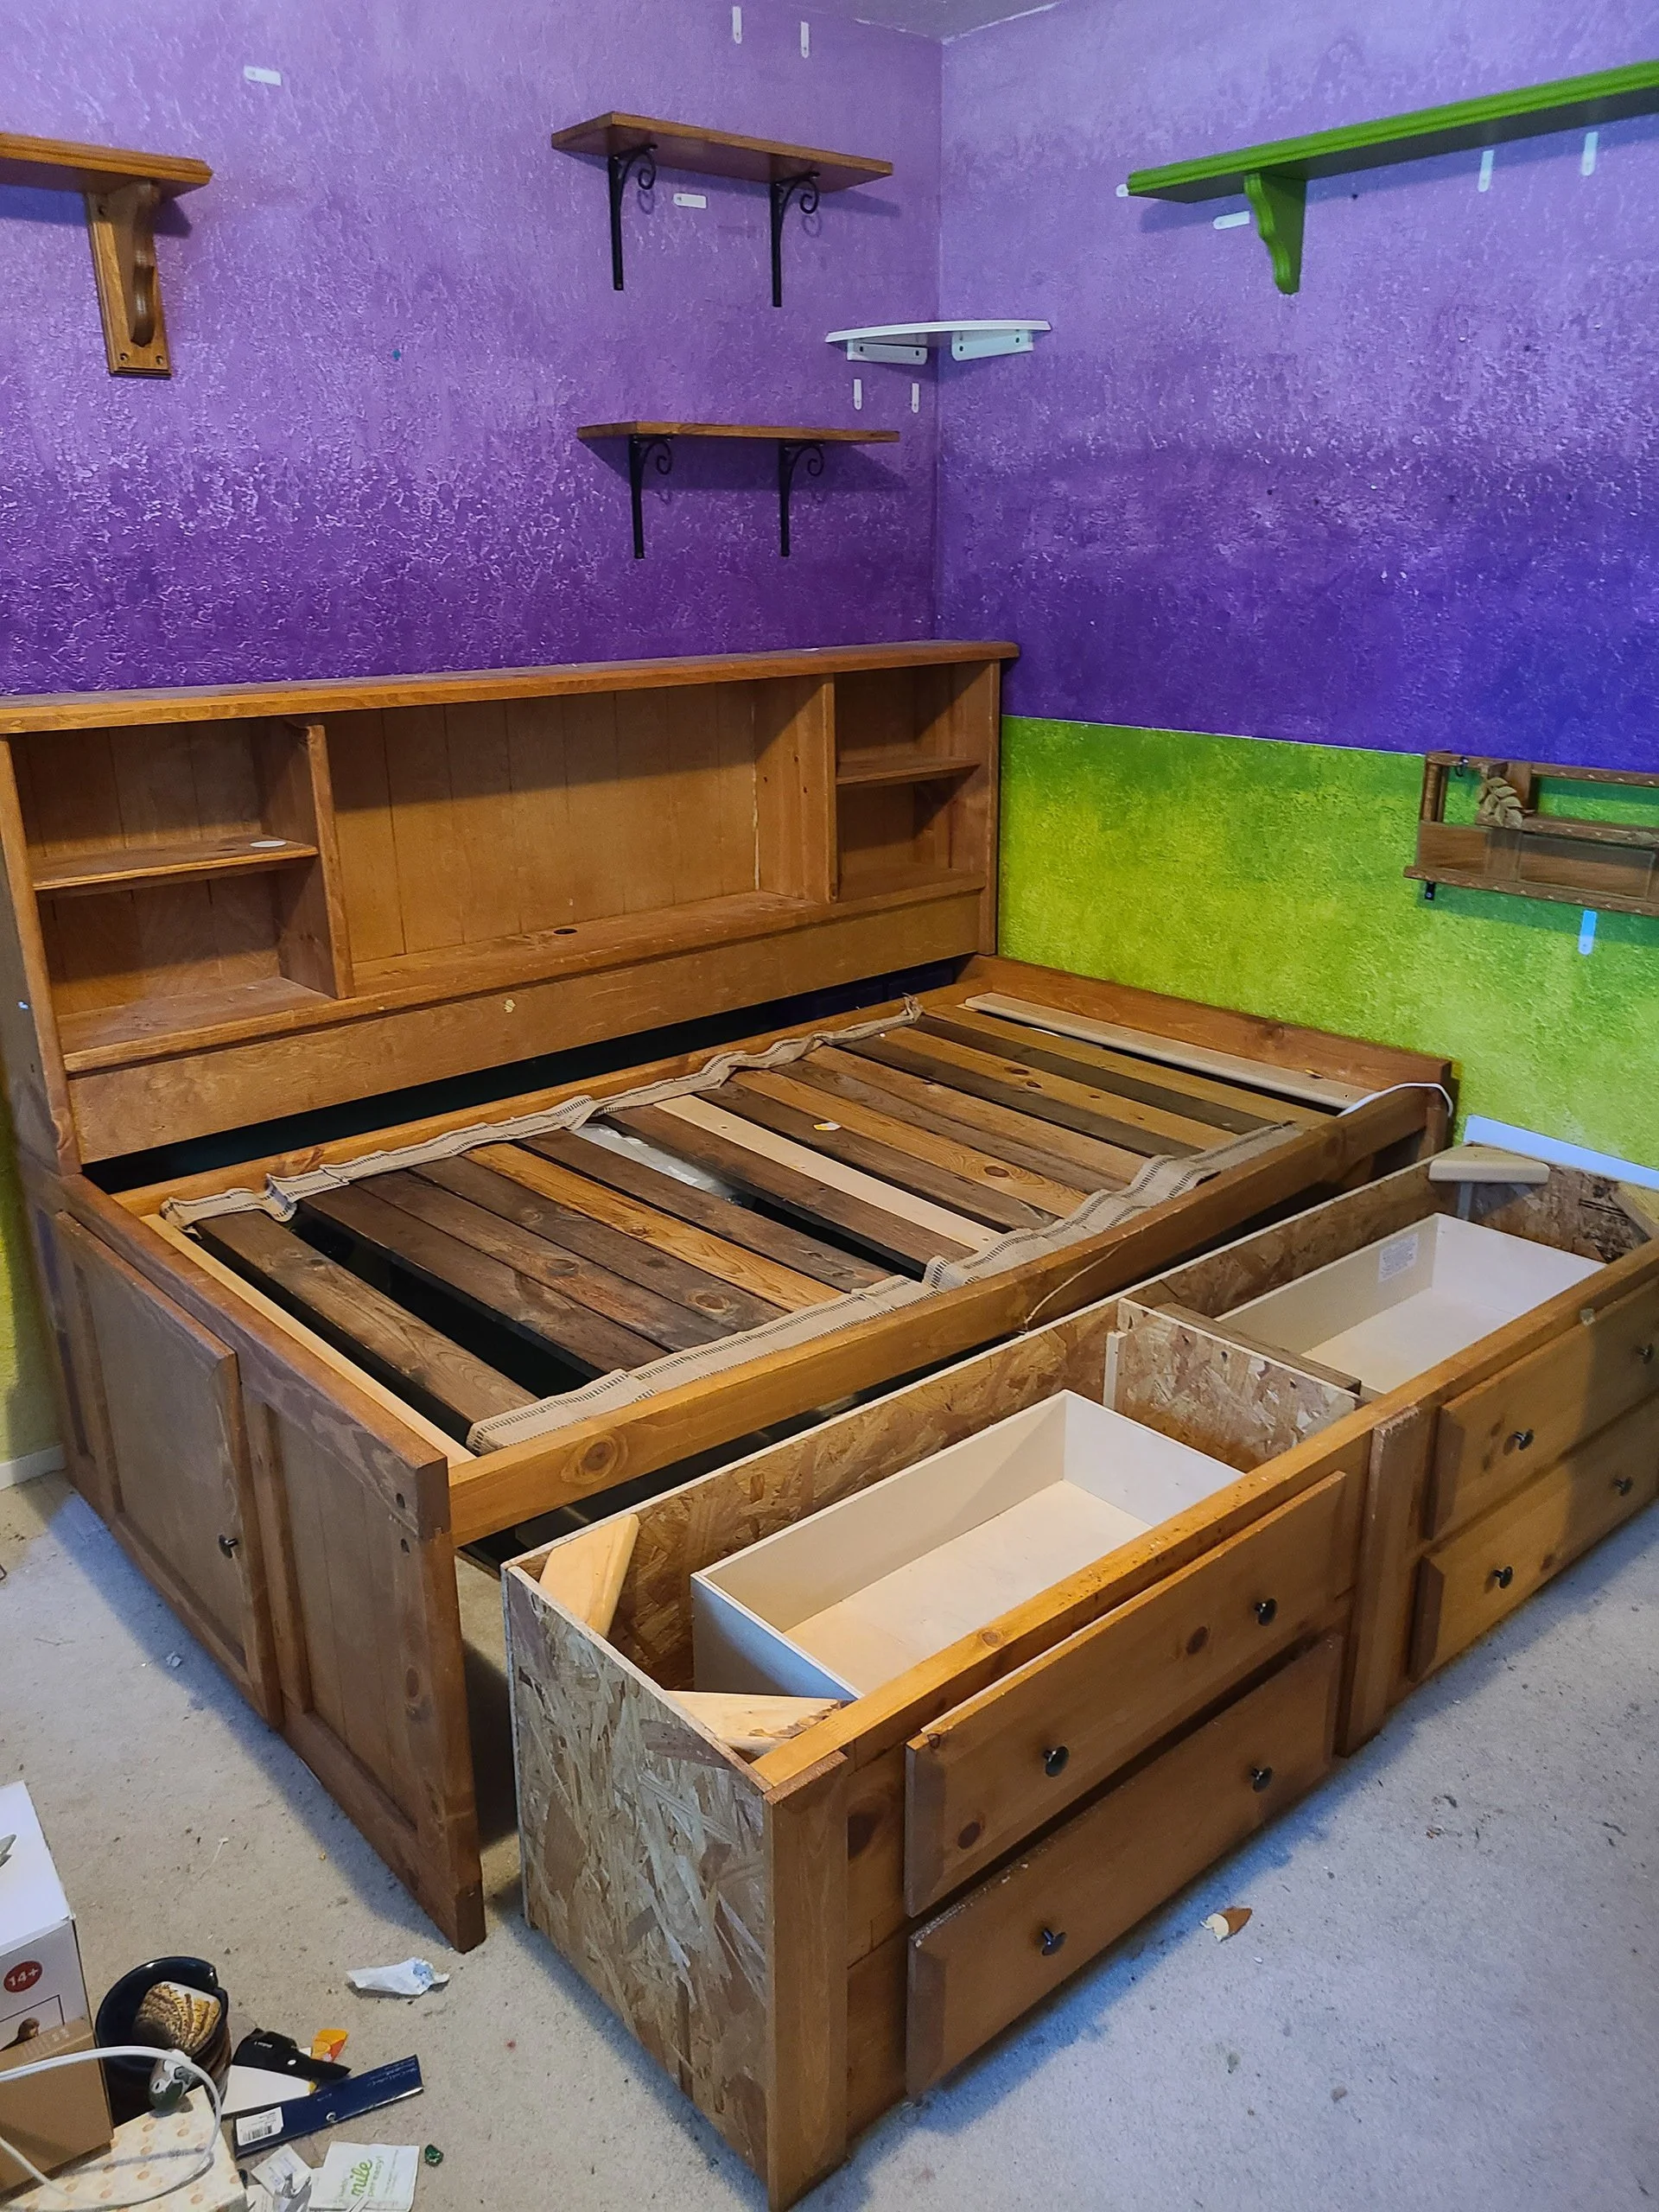
I would say the biggest motivating factor in this need for change now was getting a new bed. I have been sleeping terribly for years (still working on that) and I really didn’t want to spend money on another twin mattress. Now I had a new question of how do I fit a full size bed where a twin was? There was the simple solution, just switch them out. The way I used my twin captains bed had the drawers pulled out, so it was taking up about the same amount of space that a full would. The problem with this solution was it did nothing to solve my secondary problem which was a lack of storage and man are full bed frames with storage expensive. The only one I could find that would fit my needs was 3,000 dollars! I could make a whole new room with that!
And so the seed was planted in my mind. I didn’t really think I could make this happen back in October 2021 when I started, but in my area $3,000 would pay maybe three months rent for a teeny tiny studio in a not great area. For the ability to keep living at home and keep my sanity I was willing to spend that price, but I definitely wanted to get more than just a bed out of it. I also wanted the bright colors gone, better organization, and if possible a larger desk that I could actually have a nice computer setup on. I measured my room (as well as I could when filled) and made a model of it in SketchUp. I had never used that program before and with an architecture degree in my future I wanted to see if I liked it and how it worked. Let me tell you it’s far easier to use than some other modeling programs I have learned over the last few years.

One of the first things I decided on was that it would be best if my messiest crafts could have a place outside of my room. Just taking those out would already clean up a lot of the clutter. There wasn’t a place to move my crafting supplies, but I got an agreement with my parents to take over a corner of the garage. If nothing else things would look better in my room with the craft supplies out. That didn’t mean I was giving up on the full redesign though. I still needed a new bed and needed to know what the cost would be to make whatever came out of my head. Google was my friend and I had so many ideas that I could work with, but many would be too difficult for my basic woodworking skills or cost too much. Looking for inspiration I came across a video where a bed was made with Ikea kitchen cabinets (Original video). This was the best solution I had found so far, but I wanted to make some tweaks. I started playing around in SketchUp putting in rectangles for the cabinets and I was liking what I was seeing. I was designing with taller cabinets, 40in high, thinking I needed way more space than the short ones would give. Instead of stairs I came up with a lower platform that I could put my desk on. That was when I was in for a pleasant surprise, all the wood and Ikea furniture would cost less than $3,000. There is a final materials list in the next blog post.
That was when this whole project started to seem like something that could actually happen. My parents are wonderful and could see that I wasn’t happy stuck in a kids room. They agreed to help with the heavy lifting, so it was go time! Phase one was emptying my room and ripping up the carpet to prepare for laminate flooring. That was a fairly easy task and seeing almost everything I owned stacked in the living room was sort of eye opening. One of the first things I bought for the room was a new light, so we could actually see. My old lights were bad. I fell in love with with this leaf/flower light I found on Amazon. It was perfect for the theme I had in mind and it was remote controlled so I didn’t have to deal with my light switch if I was up on my bed. It’s great!
Putting the white primer over the bright colors was the best experience I had had in a long time. It felt so good to take a step in the right direction for my happiness. I picked out a flooring that I really liked and it just happened to be one of the cheapest, lucky me! I will say after a few months of having it, I wouldn’t suggest it to be flooring for high traffic areas or areas with kids or dogs. Its cheap which was great on the budget and is really pretty, but it scratches pretty easily. It was also more temperamental to install and we had to be more gentle with the hammer then other ones we have put in before.
Armed with a chunk of the flooring and a handful of paint sample cards, I made my first trip to Ikea. There my original plan changed slightly. Kitchen cabinets would have potentially taken months to get in, so I explored alternatives. I finally settled on the Eket Cubes to be the front of the bed. I really like them for their versatility and color variations. I can think of a lot of different ways to use them in remodeling applications. I were able to pick out a paint color that went with the flooring and the dark grey Ekets and I used the Eket customization program on Ikea’s site to figure out what I would need. Of course the Ekets I wanted were all out of stock, but I was able to find a big toy box from their Smasted collection that would work perfectly under the lower platform and the bench for it was in stock. That was the only piece that was structural for building the platform so I was happy to find it. Everything else I was okay waiting for.
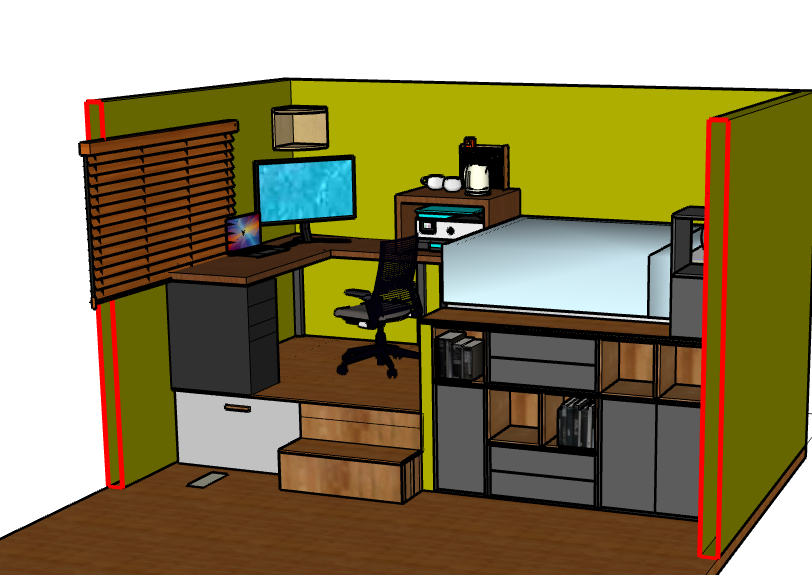
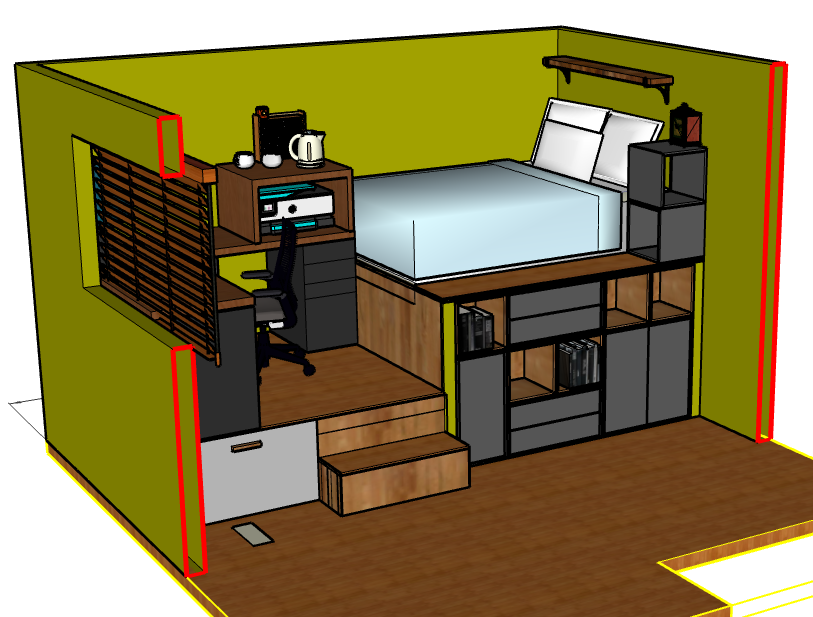
Back home we got to work painting and laying the flooring. It took about a week to get those tasks done and while waiting for the paint to dry I revamped the 3D model with the toy box and Eket cubes in mind. I also discovered the wonderful model library that is built into SketchUp where you can put models for other people to use. A lot of Ikea furniture has accurate models to work with there. I also went a little extra and added in some decorative models to really bring to life the model of the room. This was partially out of boredom, but also so I could add it to my portfolio on my grad school application. Below are some of the models I was working with starting with what I had before going to Ikea.


With the model redone to new sizes I had my lumber list and went on an adventure to Lowe’s. I have rudimentary woodworking knowledge, so I kept the platforms as simple as I could using only 1x4s, 2x4s, 4x4s and flooring plywood. I used thicker lag bolts and decking hanger brackets to attach everything and make them sturdy. You don’t need any big tools to make this. A hand circular saw or even a jigsaw is really all that’s needed, it’s just easier if you have a table saw and miter saw. I put gorilla tape on the bottom of the the 4x4s to keep them from scratching the floors if there was some movement.
Nothing was screwed into the walls or floors, but the weight of everything attached to each other keeps it all in place. It doesn’t even wiggle. I put grey trim to match the Ekets around the edge of the floor and I stained a corner trim to match the flooring to put on the lip of the platforms and stair. It was amazing how much just trim will finish off something and make it look like it’s built in when its not.

I believe I had to make 3 more trips to Ikea to get the rest of the Ekets and the two Alex drawer units for the desk and a couple more trips to Lowe’s for the desktop and legs and other bits we forgot on the first trip. The desktop was made with 24 inch panels, I believe meant for wall decor, but they work just fine. My dad installed an outlet in the floor of the lower platform that is plugged into the wall outlet almost directly under it. We did it that way so it wouldn’t be permanent and we didn’t have to put a new hole in the wall. With that done the room construction was complete! And it was ready to refill.
I decreased the number of total shelves in my room and removed the two bookshelves I had, so a great deal of reorganization was necessary. I ended up with 4 semi large boxes for donation (that felt great) and put most of my books in storage under my bed. I love books, but in reality I read on my kindle or phone more often. In a small space priorities have to be made and seeing my books was not one of them. My antique books and my absolute favorites I kept out and scattered around on different shelves. Just enough to make me happy to see them, but not taking up two bookshelves worth of space.
When I was filling my under bed space I realized I had made way more space than I needed. I am happy with the height though. I can easily move around down there and it allowed me to get some kid toy’s (Barbies) my mom doesn’t want to part with out of a closet in the hallway, so we could use that space for more useful things (craft supplies). I still had space after that too. It’s so nice to be able to hide away the stuff I won’t use until I have my own place. It also emptied up room in my closet, so that could get organized better. I ended up with space to put all my non-fiction books in the closet. They aren’t things I want to see all the time, but I needed easier access to them.
The rest was just filling and organizing. Most of what’s in this space was new. I only kept two shelves from my old room. It looks a lot more cohesive now. I am so happy with the way that it all turned out. If you want to see more detailed images and get a list of the materials that I used check out the next blog post “How to transform a childhood room into an adult’s sanctuary”.
Thanks for reading! Happy Crafting!